Welcome to the UBB.classic™ Community
Congratulations on choosing Ultimate Bulletin Board™ software, the most widely distributed Perl-based community software on the planet. This Owner’s Manual will assist you with installations, upgrades, and maintenance. These instructions are specifically designed for use with the UBB.classic™ 5.x series.
Where to Get Help
Almost anyone can administer a UBB.classic™ message board, regardless of technical skill or knowledge. However, many of the tasks described in this manual are a little bit more difficult, and you may require professional or volunteer assistance to complete them.
|
~ |
CAUTION: If you are unsure of how to follow the instructions, ask an experienced webmaster to assist you or seek help from Groupee’s Customer Support (see http://www.ubbcentral.com). When following the instructions, make sure that you go step-by-step and read all notes thoroughly before proceeding.
You can get fee-based professional installations, upgrades, and transfers from Groupee via our website at www.ubbcentral.com (click on Products>>Professional Services).
You may also wish to visit the friendly community of message board administrators in our online support forums (http://www.ubbcentral.com/cgi-bin/ultimatebb.cgi).
If you’d like to ask a question of our technical staff, you can reach them using our online question tracking system at:
http://www.ubbcentral.com/support/index.php?product=UBB.classic
Please use caution when attempting the more advanced operations, such as transferring your UBB.classic™ community. If you choose to do this yourself, you are stipulating that you have read the instructions and understand them.
What is an FTP program?
FTP stands for “File Transfer Protocol.” Some examples of FTP software include: LeapFTP, CuteFTP, and WS_FTP. Using these programs, you can securely send files to a location on a remote server. If you’re unfamiliar with FTP, you may wish to ask a webmaster for assistance; he/she probably uses FTP to make changes to your website.
A Word About Tools
Throughout this manual, you will find references to special tools that Groupee has created to assist you. These include the following.
Miscellaneous Diagnostic Tools
In addition to the Move Kit folder, additional tools are located in the Help directory of your UBB.classic™ software zip file. They include the following:
· Readme.txt with instructions
· nt_tools.zip
o hello.cgi – used to check whether .cgi is mapped
o hello.pl – used to check whether .pl is mapped
o ubb_test.cgi – used to check paths and permissions
o pathto.asp – used to help identify absolute paths for NT (not Unix)
o serverar.asp – used to help identify absolute paths for NT (not Unix).
ubb_test.cgi, serverar.asp, and pathto.asp should never be left on the server – always delete them when you are done. They may pose a potential security risk if left on the server
|
Chapter 1 |
Follow the step-by-step instructions to install your UBB.classic™ software. Remember that UBB.classic™ cannot be installed on a PC; it must be installed on a properly configured web server.
|
B |
efore beginning the installation, make sure you have the following items readily accessible:
§ A copy of the UBB.classic™ software zip file downloaded from the Member Area at www.ubbcentral.com.
§ Unzipping software such as WinZip.
§ An FTP client such as WS_FTP, LeapFTP, or CuteFTP.
§ A web browser such as Internet Explorer or Netscape.
§ From your web host:
ü Any CGI FAQ (please read it before starting the installation).
ü Your path and URL. Your URL might look something like http://www.webhost.com/~yourname or http://www.yourname.webhost.com .
ü The location of your cgi directory.
ü The path to Perl for the server on which you will install the UBB.classic™ software. For most servers, the path to Perl looks like “/usr/bin/perl” or “/usr/local/bin/perl.”
For experts with shell access - type this at the command prompt to find your Perl location: whereis perl
These instructions apply to UNIX/Linux and NT servers. Where special instructions are needed, they are noted in context. There are separate instructions for installing on Win98/PWS in Appendix G.
Please check to see that Perl is installed and mapped, before continuing. If you don’t know if Perl is installed and mapped, please consult your host or systems administrator.
1. Unzip the UBB.classic Files on Your Computer - Use your unzipping software to unzip the ubb file into a folder on your desktop or in a location you can find again easily. If you are unzipping on your own Linux or Unix machine, use the -a switch [i.e. unzip -a ubb550.zip].
IMPORTANT NOTE: Make sure that you keep a copy of the zip file in an offline location (e.g., on a diskette or backup). You will need this again if you ever need to re-install this particular version of the UBB.classic (if your server crashes, or for some other reason). If you let your UBB.classic Member Area access expire, you will no longer have free access to this original zip.
When you have finished you should have a folder containing 4 sub-folders called cgi-bin, Members, NonCGI and variable_files.
2. Log onto Your Web Server - Open your FTP client and log into your web server with the hostname, username and password your Internet provider has given you. Look at the list of files or directories you find there.
Look for the directory where your web pages are stored. You may already be in this directory if you find files called index.html or home.html. You may have to look in directories call www, htdocs or public_html to find where the web pages are stored. If in doubt ask your ISP Customer Support service.
If there is a directory called cgi-bin or cgi-local (or ubbcgi) remember where it is because you will come back to it later. If your web provider CGI FAQ requires you to use a certain directory for your scripts, find it and note the location. You will come back to it later.
3. Upload the cgi-bin Scripts - Use your FTP program to find the cgi-bin, cgi-local (or ubbcgi) or the directory your web host requires for CGI scripts. Click to open this directory.
If there is not already a cgi-bin directory, create one called cgi-bin or ubbcgi in the main web directory. You may also have to create a subdirectory called ubbcgi to keep UBB.classic files separate from other scripts you might have.
UNIX/LINUX: Use the FTP client to CHMOD this CGI directory 755 [owner rwx, group r-x, others r-x] now. Click to open it the CGI directory and set your FTP client to ASCII mode. Upload the contents of the unzipped cgi-bin folder on your computer. Select all the files you have uploaded and chmod them 755 with your FTP Client.
NT: With the CGI directory open, set your FTP client to ASCII mode and upload the contents of the unzipped cgi-bin folder on your computer.
4. Upload the Variables Files - Upload the contents of the variables files to the same cgi directory as above. You must set your FTP client to upload the files in ASCII mode.
UNIX/LINUX: Select all 4 of the variables files you have uploaded [UltBB.setup, Styles.file, forums.cgi, mods.file] and chmod them 777 with your FTP Client [owner rwx, group rwx, others rwx]
5. Create a Members Directory and Upload Files - Inside the CGI directory create a directory called Members [case-sensitive]. This directory can also optionally be located above your web root for greater security.
UNIX/LINUX: Click to select the Members directory and right click to find the option to chmod it 777 [owner rwx, group rwx, others rwx].
Open this directory. Upload the contents of the unzipped Members folder on your computer in ASCII mode.
UNIX/LINUX: Click to select the file called Admin5.cgi and right click on it to find the option to chmod it 777 [owner rwx, group rwx, others rwx].
6. Create a Directory for Your Forum Files - Change directories to your main web directory [see step 2] Create a directory there called ubb.
UNIX/LINUX: Click to select the directory and right click to find the option to chmod it 777 [owner rwx group rwx others rwx]
NT: If you run into permissions problems later in the process, you may also create this directory inside your cgi directory.
Open the directory and upload the contents of your unzipped NonCGI folder to it. You may set your FTP client to upload in automatic. Or you may choose to upload all .html files in ASCII and all the .gif and jpg files in Binary.
7. Edit Your cplinks.html File - On your own computer, open the file called cplinks.html in a text editor like Notepad. You will see basic HTML code.
Edit in the URL to your CGI directory in the BASE HREF line, between the quote marks. For example BASE HREF="http://www.mydomain.com/cgi-bin/" Be sure the path ends with a slash (/) as in the example.
Important, DO NOT EDIT ANYTHING BELOW THE BASE HREF LINE. The UBB.classic will add these in automatically.
Save the cplinks.html file and upload it again to the ubb directory.
8. Open the Control Panel in Your Web Browser - Open your web browser and go to the URL http://www.mydomain.com/ubb/cp.html [you will substitute in your domain name and directories to match the names you have chosen in the steps above]
You will see a UBB.classic control panel with links down the left side. Click the top link called General Settings.
The new page that appears in the right side has a link called 'First Time Install' Click it to open up a page of blank general settings.
Use the “Socket Test” link on the top of the page (licensed version only). If it fails, or causes an error, click your back button and click the “Read This” link for information on how to proceed.
The first section is called 'Absolute Paths'. There may be paths entered there automatically by UBB.classic. Leave them for now.
9. Set the General Settings Absolute Paths - A quick explanation: The path is the full path from your server root, for example /home/usr/htdocs/yourname [the exact path will be different in each server]
You can often find this path exactly if you click on the environmental variables link at the top of your page. Within the list, look for one variable called Script_Filename or path_translated. This will be the path to your script. Cut off the "/cpanel.cgi" from the end and you will have the absolute path to your CGI directory.
Use this path as a reference.
There are 4 absolute paths to fill in. Make sure that you use forward slashes ‘/’ in all of the paths.
Absolute path to your CGI directory [i.e.
/home/usr/docs/yourname/cgi-bin
Absolute Path to your UBB.classic directory [i.e. /home/usr/docs/yourname/ubb
Absolute Path to your Members directory [usually the CGI path with /Members
added on the end]
Absolute path to your Variables files [usually identical to the CGI path]
There are no trailing slashes in an absolute path.
10. Set the General Settings URLS - The second section is called URLS.
These will all begin with http:// ... If UBB.classic has already filled in a URL, leave it.
Check that each URL ends with a directory name corresponding to the directory names on your web server. For example, the CGI URL in a common installation will end with /cgi-bin or /ubbcgi.
The NonCGI URL will also end with a directory name, i.e., /ubb.
There are no trailing slashes on the URLS. The web site URL should be the main URL for your web site.
11. Choose Your Options - Below the absolute paths and the URLs are many choices about the names, addresses and functions of your UBB.classic.
Fill them in accurately or leave the defaults. In the licensed version, be sure to enter a valid SMTP server name and select the SMTP option. Do not use the sendmail option.
12. Submit Your 'General Settings' - At the bottom of the general settings page fill in the default username Admin5 and the password 4tugboat. Spelling and case must be exact.
Click submit. If your paths and permissions are correct, you will receive a message saying the settings have been updated.
If you get a blank screen or an error message see the troubleshooting suggestions in the Appendices of this document.
13. Submit your Styles Settings [licensed version only] - Click 'Styles' on the left hand side of your control panel. You may change any of the options listed or leave the defaults until your installation is tested completely. Check that your Admin5 name and password are filled in at the bottom and click submit.
14. Submit your Forums Settings - Click 'Forums' on the left hand side of your control panel. You may change any of the names and options there or leave them to change later. Check that your Admin5 name and password are filled in at the bottom and click submit.
15. Submit your Moderators Settings - Click 'Moderators' on the left hand side of your control panel. You may add only Admin5 as a moderator until other users are registered [only a valid registered user can be a moderator]. Check that your Admin5 name and password are filled in at the top and click submit.
16. Update Threads - It is always good practice to update threads after performing any routine maintenance of your UBB.classic.
17. Index - Click “Index” to create the search index. If you do not perform this function, your search will not operate properly.
18. Open your UBB.classic for the First Time - Click 'Your UBB.classic' on the left hand side of your control panel. A new window will open with a list of forums. Click the first forum name to open it. Look for a link to 'post new topic'. Click it and use the Admin5/4tugboat login to post a new message.
Click Register at the top right of your UBB.classic page. Register yourself and make sure you can post and reply to messages.
19. Secure Your UBB.classic Admin Name - After you have registered your own name successfully, go back to the control panel and click on 'User Info and Permissions' on the left hand side.
Log in with Admin5/4tugboat and search for your own name. Use the option check box to make yourself an administrator. Test that your own name is accepted for administrative functions.
Close your browser, and then re-open it; this is VERY IMPORTANT. Because UBB.classic uses cookies to recognize you, you will not be able to perform the next step unless you re-set the cookie to recognize your new username as the administrator.
AFTER you have given yourself admin permission, tested that function, and closed/reopened your browser, we strongly recommend that you use the 'User Info and Permissions' link to delete the Admin5 user for security reasons. If you wish to keep the Admin5 user, you must change the password by clicking the 'profile' link on any regular UBB.classic Page.
|
Chapter 2 |
When you upgrade your UBB.classic to a new version, you can keep all messages, members and styles.
Groupee offers professional upgrades as a fee-based service, so if you’d prefer not to perform the upgrade yourself, you can purchase professional services from Groupee via the website at http://www.ubbcentral.com.
1. Unzip the program file - Once you download the zipped program file, you will have to unzip it using a program like WinZip. After you unzip the program, you will notice that all files are in four separate folders: cgi-bin, NonCGI, Members, and variable_files. (If you are upgrading with an update patch, you will only have the files that need to be replaced or added, so you may not have four folders.)
If you are upgrading to 5.38 or higher from the freeware version OR from a licensed version before 5.38, realize that there are new icons that have been added to the UBB.classic. You need to create a new subdirectory called "icons" in your UBB.classic NonCGI directory. Create that directory and then upload all files in your zip NonCGI/icons folder into your UBB.classic icons directory.
If you already have Version 5.25 or higher installed, you should go to your control panel and turn your UBB.classic off (general variables option) while you are upgrading. This will prevent your visitors from causing any problems while you upgrade. (The option to turn your UBB.classic off is not available before Version 5.25.) Then, Upload files to appropriate directories. Upload all of the files in the cgi-bin folder to your UBB.classic CGI directory. Upload all of the files in the NonCGI folder into your UBB.classic non-CGI directory (usually this directory is called "ubb").
Do not upload the files in the Members and variable_files folders; those are for users installing the UBB.classic for the first time only.
Remember to upload all of the CGI folder files in ASCII (not BINARY). If you are a Mac Fetch user, "Text" mode is equivalent to ASCII.
Some FTP programs have an auto-mode that chooses the mode for you. If you upload in auto-mode, make sure you add the following extensions to your FTP program's ASCII extension list: ".setup", ".file", ".pl", ".cgi". Also, make sure that your FTP program does not convert the file names to lowercase.
2. Set Directory Permissions
NOTE: If you are installing on a Win32/NT web server, you can skip this step. If you are installing on a UNIX system, you MUST perform this step. If you are upgrading on a UNIX-based server, you don't have to reset any directory permissions, but if new CGI files are being added in the upgrade, you should ensure that the following permissions apply to all of your files:
NON
CGI directory: 777
CGI directory: 755
Members directory: 777
All Forum directories: 777
Within the CGI directory, set all files to 755, except for the variable_files (mods.file, Styles.file, UltBB.setup and forums.cgi), which must be set to mode 777.
If your web server does not allow you to have files set to mode 777 within the CGI directory, you will need to make the changes noted in Appendix B (What to Do if Your CGI Directory Will not Accept Writeable Files). Most web servers do not have this restriction.
3. Set the Path to Perl - All of the .cgi files (except the cgi files in your Members directory) run using the Perl that resides on your server. The first line of each Perl program starts with #!. For instance, in our scripts, the default Perl line is:
#!/usr/bin/perl
This refers to the absolute path location of Perl on the server. Most servers follow this path for Perl. But your server may be configured differently. If so, ask your provider or system administrator for the correct path for Perl. Then replace your path with the path we have listed on each of the files that ends in ".cgi". Remember that Perl 5 is required. The UBB.classic will not run with Perl 4. [Exceptions: the Admin5.cgi and forums.cgi files are not really CGI applications and thus no Perl path is required.]
4. Customize your Script - If you are finished doing all of the above, it is time to start customizing your script. You will do this from the browser.
You should manually edit the cplinks.html file to reflect the correct location of the links at the side of the page.
If you are installing the freeware version, there are only 6 links you need to change: Variables, Moderators, User Info & Permissions, Edit/Prune Messages, Your BB, and Update Threads. Do not modify the link for "Order UBB".
If you are installing the licensed version:
On your own computer, open the file called cplinks.html in a text editor like Notepad. You will see basic HTML code.
Edit in the URL to your CGI directory in the BASE HREF line, between the quote marks. For example BASE HREF="http://www.mydomain.com/cgi-bin/" Be sure the path ends with a slash (/) as in the example.
Important, DO NOT EDIT ANYTHING BELOW THE BASE HREF LINE. The UBB.classic will add these in automatically.
Save the cplinks.html file and upload it again to the ubb directory.
IMPORTANT--- Every time you upgrade, you should reset your General Settings, your Styles Settings, and all FORUM Settings and then Update Threads (in your control panel). You should then re-Index, just to be safe. Even if you are making no changes, just click on the SUBMIT button on each page. This will ensure that any new variables added in the upgrade are added to your system.
If you are changing the location of your UBB.classic, you will need to adjust your Absolute Paths in the General Variables. A reminder about setting absolute paths:
Absolute Paths - NT
The proper way to designate an absolute path in Windows NT for a directory that is on the D: drive that is at the path d:\www\user1\ubb is:
D:/www/user1/ubb
Note: The / is used instead of the normal \ in the path name. You should always include the drive letter in your absolute paths.
HINT: Don't forget to Update Threads in your control panel each time you upgrade. This can be a time-consuming step if you have many messages stored, so make it the last thing you do when upgrading.
NOTE: Be sure to register your UBB.classic name and URL either in the UBB.classic Members Area (follow the link for updating your registration) or in the Control panel of the licensed version (there is link entitled "Your License").
Absolute Paths - UNIX
Remember that the absolute path means that you need to list the entire path from the server root, not the web root. An example of an absolute path for UNIX is:
/usr/www/yourdomain/cgi-bin
You can use the Environmental Variable link on your General Variables page to help you configure your absolute path variables.
Finally, if you are upgrading to the licensed version for the first time, or if you are upgrading from a licensed version before 5.0, you should create your index for searches. You only need to do this once... the UBB.classic will update it for you automatically after that. To create your index, go to the Index area of the control panel. You must also re-enter your Forum names and descriptions in the Forum Settings (only if you are upgrading from a pre 5.10 Freeware version for the first time).
Copyright Notice & Usage Disclaimer
Although you may customize the UBB.classic™ software as you see fit for your own personal use, you MAY NOT alter the copyright and "powered by" notices throughout the script. You must also make sure the notices are VISIBLE on your web pages.
Also, by using this script you agree to assume full liability for any content you or others post on the message board. You also agree that Groupee, Inc. is not liable for any mishaps that may result due to installation of the script. This script MAY NOT be sold or in any way licensed without the express written consent of Groupee, Inc. For the complete license agreement, see:
http://www.ubbcentral.com/terms.php?product=UBB.classic
|
Chapter 3 |
Moving Your UBB.classic™ Community
It’s possible to move an entire UBB.classic™ message board to a new server and keep all messages, members, and styles intact. The process requires you to take care to preserve permissions and data types.
Groupee, Inc. offers support for transfer issues as a fee-based service, so if you’d prefer not to perform the transfer yourself, you can purchase professional services from Groupee via the website at http://www.ubbcentral.com
HINT: Do not try to attempt an upgrade of your UBB.classic at the same time as you transfer. It is recommended that you perform the transfer first, then the upgrade. Also ensure that your existing UBB.classic works correctly at its present location, as attempting to transfer a broken board will create serious problems.
CAUTION: You will be adding some very large files to your old server. Be absolutely sure there is disk space for the task.
The Move Kit
There are some tools available to help you forward your members from your old UBB.classic™ location---see http://www.ubbcentral.com/downloads and look for the Move Kit.
Before you begin, turn off your existing UBB.classic™ message board in the control panel General Settings.
1. Confirm that UBB.classic Will Run in the New Location - Install a copy of your own licensed version on the new server. Confirm every function: posting messages, register new members, editing and updates. Use the first time installation instructions as needed (they are located on the same web page as this document).
Copy all the paths and URLs from the control panel General Settings.
Delete all of the UBB.classic files, but leave the directories you created.
2. Gather the Old Files - For a small UBB.classic, the process can be as simple as selecting the relevant CGI, Members and NonCGI directories and using your FTP to download files to your own computer. You must set your FTP client to transfer all files with the .cgi, .pl, .file and .setup extensions in ASCII mode. Do not forget this step or your files will not work in the new location.
For the sake of simplicity, download your Members directory, your NonCGI directory and your CGI directory separately.
On larger UBB.classic's you will want to compress files to speed up the process.
UNIX/Linux Users can 'tar' up whole directories with: tar -cfp filename.tar * in the directories they want to transfer all at once. This option will be available only if you have telnet and shell access on your old server. Type man tar or man gzip for detailed instructions.
Windows NT users can zip up directories where it is possible. Be sure to preserve the directories when you do so.
3. Transfer the Old Files to the New Server - You can download files to your own computer and upload them to the new computer. Zip or tar files must transfer in binary not ASCII.
If you have telnet and shell access on at least one server, you can open an FTP session directly between the two servers. This is for advanced users who are comfortable with command line FTP. This is much faster than using your own personal computer.
4. Recreate the Old Directories on the New Server - If you are transferring a small number of files up from your own computer you can do so by FTP. Upload each batch of files to the corresponding location on the new server [i.e., the contents of Members to Members and all files in the NonCGI folder to your new NonCGI location].
For Linux/UNIX you can 'untar' the tar file you made on the server. Use tar xfp filename.tar. Type man tar or man gzip for detailed instructions.
For Windows NT users you can unzip your compressed file on the new machine if you have the rights to this. You may have to ask the admin for help.
5. Inspect your New Installation - Make sure that there are directories and files corresponding to your old site in your new location. Do NOT try to run your UBB.classic yet. If you somehow failed to transfer over all files, you will have to go back to Steps 2 and 3.
6. Set Permissions - If the new server is a Windows NT machine, your work is minimal. Your directory permissions will be correct if you performed Step 1 properly and your files are in the same directory locations as your test installation.
UNIX/Linux users will have to recreate correct permissions in the new location. Do not trust the tar process to keep your permissions accurately. Go through your CGI directory and apply 777 permissions to the 4 variables files. Apply 755 permission to the scripts.
You must apply 777 permissions to the contents of the Members directory and to the contents of all Forum directories. There are many.
Failure to apply correct permissions to all files is the most common transfer mistake.
In small transfers it is simplest to use your FTP client to select batches of files and apply the new permissions. For larger numbers of files you can use the chmod -R 777 yourdirectoryname to apply permissions recursively through a directory. This is very fast and highly recommended if you have shell access. Apply this command to the Members directory and the NonCGI directory.
7. Edit Your cplinks.html File - Make a local copy of cplinks.html on your own computer. Use Windows Notepad or some other text editor to open the file for editing.
Edit the <BASE HREF = ... tag so that it contains the full URL to your CGI directory. For example: <BASE HREF="http://mynewdomain/cgi-bin/">. Make sure this URL ends with a single slash and no extra white space.
On pre-5.45 version UBB.classics you will have to edit each link in cplinks.html.
8. Configure Your General Settings - Open the control panel in the new location and click 'General Settings'.
Click the link to configure UBB.classic for the first time. Do not attempt to login with your old username and password.
In the Paths and URLs section of the General Settings, enter your new paths and URLs for the new site. Use the values you saved from Step 1.
Enter a new sendmail location or SMTP server name as needed. Consult your ISP for help.
Scroll to the bottom of the screen and enter your admin username and password.
9. Submit the General Settings.
10. Submit Styles, Forums, and Moderators Values
Open each control panel link for Styles, Forums, and Moderators and submit the settings. You do not need to change any values.
11. Update Threads - Use the 'Update Threads' link in the control panel to apply the new settings to all of your topic files. Do not skip this step.
12. Test All UBB.classic Functions - Browse though your UBB.classic making sure new, topic, reply, edit and new registration work correctly. Errors in these functions almost always result from incorrect permissions. See Step 4. Test the email functions with the UBBFriend feature.
13. Redirect Users from Your Old UBB.classic - Download ubbmove.zip (see www.ubbcentral.com Customer Support) and open the archive onto your desktop.
Open both the Ultimate.cgi and forumsdisplay.cgi file (from ubbmove.zip) in Windows Notepad or any other text editor.
Edit in the full URL to your new UBB.classic location. For example http://mynewdomain/cgi-bin?Ultimate.cgi. Save the files and then upload them in ASCII mode to your old UBB.classic CGI directory. This will overwrite the old Ultimate.cgi and forumsdisplay.cgi files.
Test the redirect script by entering your old UBB.classic URL in a browser. You should be redirected to the new location.
14. Troubleshooting
Images Appear Broken - re-transfer all the .gif and .jpg files in binary instead of ASCII.
Control Panel Values are Not My Old Settings - re-transfer UltBB.setup, Styles.file, forums.cgi and mods.file in ASCII mode from the old site.
Old Information and Links still Appear in Topics - update threads in all the forums through the control panel
Email does not work - enter a correct sendmail or SMTP setting in the control panel General Settings.
If you are having other problems, first go through the instructions again and see if you missed a step. You can also ask a question on our Ultimate Bulletin Board support forums, or using our online inquiry system (see the Customer Support area of http://www.ubbcentral.com.com).
|
Chapter 4 |
Administering Your UBB.classic™ Community
This chapter will help you make basic changes in the control panel to suit the needs of your online community.
Each control panel link below is described in detail.
§ Miscellaneous and/or Debugging
§ Your UBB [this link opens your UBB]
§ Index
§ Archives
§ Your License and Version Updates [this link provides license information]
§ Quick Start Help [this opens a set of help links]
General Settings
This section controls site-wide options for your UBB.classic. Many will require an ‘Update Threads’ cycle to apply across all your UBB.classic pages.
Absolute Paths
These values have been set at installation and should not be changed if your UBB.classic is operating properly. It is wise to copy these paths and store them somewhere in case you ever need to restore your UBB.classic configuration.
URLS
These values have been set at installation and will not normally be changed.
If you are switching from an IP address (e.g., http://123.456.78.99/cgi-bin/Ultimate.cgi) to a domain name (e.g., http://mydomain/cgi-bin/Ultimate.cgi), you need to run an ‘Update Threads’ cycle to apply the settings across all UBB.classic pages.
Display Options
Your Email Address
The
setting must be a valid email address in order for your UBB.classic email
functions to work correctly. It is also the address used by the ‘Contact Us’
link on every UBB.classic page.
Name of Your UBB.classic
See
instructions in the control panel
Name of Your Homepage
See
instructions in the control panel
Default Topic View (Days)
A new visitor will see topics dating back this number of days on your
UBB.classic. When your UBB.classic is new, it is wise to set a high number [60+
days]. If you have a very busy UBB.classic, reduce this number
accordingly. If you are using the UBB.classic as an archive, use
‘Show All Topics’. Remember that users can set their own page view preferences.
If users complain that topics have ‘disappeared’ ask them to check their page
view setting with the preferences link.
Header/Footer
You
can enter HTML code here that will appear at the absolute top and bottom of all
your UBB.classic pages. It is a powerful tool for adding advertising banners,
custom page layouts or navigation menus.
Banners
Cut and Paste the banner code supplied by the advertiser directly into the text
box. If your banner requires a random number, substitute the word UBBRandomX or
UBBRandomY in every place where a random number is required (ie.
longlink& adnumber=UBBRandomX).
Ad Banner code that requires an SSI [Server Side Include] will not work in the header/footer section.
The UBB.classic can appear within a custom page layout through the use of tables. For example, a common way to add a left hand side menu is to add the code below.
In the header box insert this code:
<table width=95%>
<tr><td>
Put Your Own Side Menu HTML code here
</td>
<td>
In the footer box insert this code
</td></tr>
</table>
If you are comfortable with more advanced HTML you can create other sophisticated layouts for the UBB.classic. Be very sure to create correct opening and closing HTML tags. If you add form content, do not forget the closing </form> tag in the header. Without it, the UBB.classic will not function. Likewise all custom JavaScript entered in the header/footer must be correct or the UBB.classic ‘Lightbulbs’ and user preferences will not work.
Category Display Option
Use
the “Yes” option only when you plan to use categories to organize your forums.
You must define categories first in the ‘Forums Settings’ section of the
control panel. You must also assign each forum to a category. See the
instructions for ‘Forum Settings’ elsewhere in this guide.
Display Only the Categories on First Page?
A
very large UBB.classic with multiple categories and dozens of forums
can set this option to “Yes”. Doing so will display only the category
names on the UBB.classic main page. The user will click a category name to
display a list of forums within the category. Do not use this option unless you
have Categories defined.
Display Forum Descriptions?
You
can save space by suppressing all forum descriptions. Only the forum names will
appear.
Display Privacy Statement Link?
Setting
this option to “Yes” will insert a Privacy policy link at the bottom of each
page. Be sure to define a correct privacy link URL in the URLS section. Run an
‘Update Threads’ cycle to apply the link to all existing UBB.classic pages.
UBB.classic Rules
Cut
and paste your community rules here. Users will have to agree to them before
they can register. Since these rules have legal significance, think carefully
about the content. The default content is an example only and must not be used
without editing.
Children’s Online Privacy Protection Policy Wording
American-based
web sites that expect users under age 13 must comply with the Children’s Online
Privacy Protection Act. Consult competent legal advice to determine whether you
need to comply with this law.
Children's Online Protection Policy Instructions
This
wording will appear at the top of the registration form if you are using the
Children's Online Privacy Protection [COPPA] ‘Age Check’ option [see
below]. Enter the information that will allow a parent to FAX, mail or
otherwise grant permission for a child to use your UBB.classic.
Your Copyright Wording
See
instructions in the control panel.
UBB.classic Copyright Type
Choose
image or text to suit your UBB.classic page. It is a requirement of the
UBB.classic license to keep visible all ‘Powered by’ notices in the
UBB.classic.
Block Public Display of User Email Addresses?
See
instructions in the control panel.
Allow Signatures?
See
instructions in the control panel.
Allow Images in Signatures?
Use
this option to allow the UBBCode™ image tag in a signature. Users can enter a
link to any image on the web so this option is not advised.
Show Total Topics/Posts/Both?
See
instructions in the control panel.
Reverse Thread Order?
This
option is not advised.
Display Member Total?
See
instructions in the control panel.
Header Insert
Code
entered here will appear between the <Head> </Head> tags of
each UBB.classic page. Common uses for these values are custom meta tags or
Javascript functions. Do not confuse this section with the Header/Footer
options above. The code in this section is not visible.
Allow Posting Icons?
See
instructions in the control panel.
Use Reply with Quote?
See
instructions in the control panel.
Include Inline Frame View of Topic on Reply Page
See
instructions in the control panel.
Maximum Topics Displayed Per Page
See
instructions in the control panel.
Display Hot Topic Icons?
See
instructions in the control panel.
Search Options
§ Allow Searches?
§ Allow Searching of All Forums?
§ Index File Method
A smaller UBB.classic will find the ‘Create One Index File’ option speeds up a search. However, larger UBB.classics are strongly advised to leave the default setting. You may switch between these options as long as you run an ‘Index’ cycle though the control panel.
Email Options
UBB.classic
functions that depend on correct configuration of these settings include, Lost
Password, Notification on Reply, UBBFriend, Mass Mailing, COPPA and Digests.
Email On/Off
Turn
Email ‘Off’ to suppress all UBB.classic email functions or if you do not have
correct email settings available.
Email Service to Use
See instructions in the control panel
Sendmail Location [Unix/Linux Only]
See
instructions in the control panel.
SMTP Server Name [Win32]
See
instructions in the control panel.
UBBFriend
Set
this option to ‘Registered Users Only’ to minimize potential abuse of the
feature and to encourage guests to register.
Date/Time Display Options
Time Zone
See
instructions in the control panel
Server Time Zone Offset
See
instructions in the control panel
Server Time Zone Offset
See
instructions in the control panel
Registration Options
Verify User Email Address During Registration?
Unless
you have a need to verify all email address, leave this option set to ‘No’.
Users will then be able to choose their own passwords and begin posting on your
UBB.classic immediately.
Email Duplicate Check
See
instructions in the control panel.
Children's Online Privacy Protection [COPPA]
See
instructions in the control panel
Show Permission Form Only
See
instructions in the control panel.
Moderate Registration Requests
If
you choose this option, users can register but not post until you approve their
membership in the User Info & Permissions section of the control panel.
Notify Admin of New Registrations
See
instructions in the control panel. Email settings must be correct.
Email Address used for Notification
This
address must be a valid email address. Do not leave it blank if you plan to use
the COPPA Age Check or Membership Moderation.
Suspend Registration
See
instructions in the control panel.
Use Registration Fields for Your UBB.classic
Leave
this option set to “Yes” unless you plan to have a board with no registration
requirements whatsoever, no moderators and no need to identify yourself as an
administrator when posting. If you wish not to allow registration, use the
‘Suspend Registration’ option above.
Miscellaneous Options
Turn Your UBB.classic Off?
It
is wise to turn your UBB.classic off when running an Update Threads Cycle or
when Pruning Messages. This will lessen load on the server, speed the process
and prevent inadvertent corruption of the data by another user.
Bulletin Board Closed Message
See
instructions in the control panel.
Minimum Number of Messages For Full Member Status
If
you do not want the ‘Junior Member’ status for any user, set this number to 1.
Use Alternate User Titles?
See
instructions in the control panel.
Censor Option
See
instructions in the control panel. Understand that this filter does not prevent
users from figuring out new ways to spell and type banned words. It is wise to
use membership settings and the Ban List functions to deal with troublesome
users.
Allow User Editing of Messages?
See
instructions in the control panel.
Log/Display IP Numbers For Posts?
See
instructions in the control panel
Administrative Activity Log
See
instructions in the control panel.
Cookie Option
See
instructions in the control panel.
Author Column Display
See
instructions in the control panel.
Require English Letter or Number in Subject?
See
instructions in the control panel.
Flood Check?
See
instructions in the control panel.
Check here to rebuild the forum thread files
This
option will be checked by default. It is necessary to rebuild data files after
an upgrade or transfer. It is useful if you suspect the counts are
incorrect in your forum numbers. You may uncheck this option to speed up the
process of submitting your general settings.
Style Settings
This section of the control panel sets the Site Wide Style Settings for your UBB.classic. You can change fonts, table colors, table border colors, text sizes, and graphics.
Custom Styles may also be set on individual forums. This means that site-wide Styles will not apply to the individual forums unless you use the Forums details link to apply the new Styles. See the Forum Settings section elsewhere in this guide.
Keep in mind that whenever you change your Style settings, you must run an ‘Update Threads’ to apply the new Styles to UBB.classic pages
Color Options
Samples of the current color set are beside each option. Use the ‘Select New Color’ drop down menu to choose from predefined colors or enter the HEX color code for the new color.
The copyright text color may not be set to the same color as the background to hide the UBB.classic ‘Powered by’ notice.
Miscellaneous Graphic Options
When defining a default font, select fonts that will appear well on all platforms. Do not select fonts which users are unlikely to have. A shorter list of fonts will speed page loading.
Graphic Images
Use FTP to upload your custom images to the NonCGI directory you created at installation. This is the directory where the UBB.classic graphics and HTML files already are stored. All custom graphics must go in this folder. If you decide to change the image name in this section, enter only the filename (i.e. newgraphic.gif) not the full URL to the graphic. Any graphic format is acceptable.
Icons
You can replace default posting icons or add more. All icons you use
belong in the UBB.classic /icons sub directory and named in this format:
iconX.gif (with X being the icon number). You can have up to 99 icons, though
we recommend you use no more than 10-20.
Any new icons must be the following size:
Width = 15 pixels
height = 15 pixels
The UBB.classic automatically looks in the icons directory for icons named in that format (iconX.gif). To add a new icon, just create the icon as a gif, size and name it properly, and upload it to the UBB.classic non-cgi /icons directory.
Forum Settings
This section of the control panel controls the names of Forums, their descriptions and custom Styles. Each forum can have specific permissions for posting and privacy. Use this section to add and apply new categories for your UBB.classic.
This section of the control panel will open with a listing of your existing forum names, their display order, the on/off status and the category in which they will appear if any categories have been defined.
The details link opens specific properties for each forum.
UBB.classic is installed with 9 default forums. You can rename these or add as many new forums as you wish. You may not delete forums but you can turn them off so that they no longer appear.
To Add A New Forum, Click Here
Use
this link to add a new forum. If you wish to add several new forums use the
‘Add New Forum’ link each time. Do not use the back button in the
process. See details below.
Add/Review Categories
Use
this link to create a new category. A category allows you to group many forums
under one category name. If you wish to add several new categories use the ‘Add
New Category’ link each time. Do not use the back button in the process. See
details below.
Using the Add Forum or Details Link
The
properties for a new or existing forum appear in the same way.
Name
A
short name is advised for effective layout.
Category
Options
will only appear if you have defined one or more categories.
Status
On/Off controls
whether the forum appears at all on your UBB.classic.
HTML Allowed?
Do
not enable this option unless you are sure users can and will enter correct
HTML code. The <SCRIPT> tag is not permitted.
UBB Code Allowed?
UBB
code is a good alternative to HTML. It allows many common HTML functions
without risking the display problems caused by bad HTML.
UBB Code Images Allowed?
Block
the ability to post any images on your UBB.classic by turning this option off.
Moderator Notification?
Email
functions must be correctly configured and a moderator must be defined for the
forum. Using this option will cause an email to go to the moderator
whenever a new topic is created.
Access Limits
The default setting for UBB.classic forums is a publicly viewable form
where only registered users can post new topics or reply. You may configure
each forum with the following options:
Select ‘Completely Private – Read/Write’ to restrict the forum to Administrators, the Moderator of the forum and other authorized users.
Do not select this option if you want a publicly viewable forum. Know that making an existing public forum private or making a private forum public again will not transfer the messages with the change.
Maximum/Minimum Security
Choose
according to your site needs.
Forum Description
Enter
a forum description here if needed. Be sure that ‘Display Forum
Descriptions? is set to Yes in the General Settings. HTML is allowed in
descriptions.
Custom Header/Footer
Forums
will use the header/footer code you defined in the General Settings unless you
enter new values here.
Forum Display Options
Forums
will use the header/footer code you defined in Styles unless you enter new
values here. These options allow you to specify colors and graphics for
an individual forum if required.
Check here to restore style settings set in your overall
Style Settings area
This
checkbox at the bottom of the Forums properties page will rest your forum to
the site-wide Styles you have selected. Use this option whenever you change
site-wide Styles and want the new values to display in all forums.
Add/Review/Order
Categories
This link will open with a listing of existing categories, if any. You
may edit the existing Category names as needed. HTML is not permitted.
On the right hand side you can specify the display order of the categories.
You can add a new category at the bottom. Be sure to surround each category name with square brackets or they will not be saved. HTML is not permitted.
Categories cannot be deleted. However, they can be renamed or not used.
Update Threads
This section of the control panel will rebuild the HTML topic pages in an individual forum or site wide as needed. It is required in order to apply new Styles, Forum names or General Settings to your UBB.classic.
It is recommended that you not use this function until you have completed all other changes in General Settings, Forums and Styles.
There are only two options to choose from:
Specify Forums To Update:
The ‘All Forums’ setting is the default and is required to apply new
General Settings site wide. You can choose to update an individual forum if you
have changed settings only for one forum.
Cycle Rate
This
setting will depend on the size of messages and the number of members on your
UBB.classic. The ‘Update Threads’ process is CPU intensive and you may need to
set this value lower if the process times out or returns an error.
User Info & Permissions
This section of the control panel controls all user permissions. You can suspend or restore posting privileges, grant access to private forums or delete a user altogether.
You will use this section to moderate membership requests if you have turned on COPPA ‘Age Check’ or want to approve all membership requests.
Moderate Registration
Requests
Use this form to display recent registrations. Specify the number you want
displayed with the drop down menu.
Select ‘All registrations’ to display all recent registrations regardless of status.
If you have selected ‘Moderate Registration Requests’ in the General Settings, users can register normally but posting privileges are suspended until you grant them. Use the ‘All Users without posting rights’ to list new members requiring approval.
Choose the ‘Under 13’ option only if the COPPA ‘Age Check’ is enabled in General Settings.
Search for Registered Users:
You
can display a user or users by searching your complete list of registered
members.
User Name
Partial
name matches are permitted. Wildcards matches are not.
Email Address
Partial
address matches are permitted. Wildcards matches are not.
Number of Posts
Specify
less than, more than, or an exact number of posts.
View all registered users
This
option will display all registered used regardless of other search options
selected. It is not advised for large membership lists.
Search by Access:
Status
Select
a status search. This is useful for displaying which members have access to
private forums. For very large membership lists, 1000+, results will be quite
slow or may not appear at all. This is a known issue.
Access to Private Forums (if you have any)
Select
a forum, to search for all users with access to that specific private forum.
Setting User Permissions
Either search method described above will display a user or users.
Here are the user options available and the information included with each profile.
Delete
Checking
this option will delete the user permanently.
User Name, Reg. Number, Date
Registered
The registration number may be useful to locate a specific user file in
the Members directory.
Notice that the User Name is hyperlinked. You will use this link for a full listing of individual user information. See ‘User Properties’ below
Able to Post Notes?
Select
“Yes” to allow posting. If you have selected Membership Moderation or the COPPA
‘Age Check’ you will use this setting to grant full membership status. Select
No to suspend posting privileges but retain the member in the UBB.classic list.
Authorized Administrator?
You
can make any registered members a full Administrator by selecting
Yes. You can remove an Administrator status by selecting No. Take
care not to remove your own Administrator status.
Status
Self-explanatory.
Any custom user titles are not used here.
Total Posts
This
includes both new topics and replies.
User Properties
Each User Name displayed by a search is hyperlinked. Click the link display the
user profile including permissions to access private forums.
All available information about the user is displayed except the password. The administrator cannot view or change the password.
At the bottom of each user profile is a list of any private forums you may have defined in the Forums section of the control panel. Grant access to a private forum by checking the appropriate forum. Uncheck the forum to remove access.
By definition, Administrators have access to all forums and Moderators have access to their own forums.
Ban Lists
This section of the control panel controls any restrictions on what IP addresses are prohibited from posting topics or replies and what email addresses are blocked from registration. It is a useful but not completely foolproof way to deal with troublesome users.
Email Ban List:
It is recommended that you use only the domain name of an email address
or a specific username. Partial matches are a useful filter as well.
Put each email address or username on its own line.
IP Number Ban List:
If you have IP logging enabled in the General Settings you can find out
the IP address of a troublesome user.
Enter the IP numbers in the text box, one per line, in order to keep a user from this IP address from registering or posting. Viewing of the UBB.classic is still permitted.
Read the control panel directions carefully to create a useful filter. A complete IP address for a dialup account is not useful since the IP changes with each dialup. Shorten the IP address by removing the last digits back to the final period e.g., 123.45.678.
Put each IP address on its own line.
Moderators
This section of the control panel controls who are Moderators of your UBB.classic forums.
The Moderators link opens up a list of forums and their current moderators. Up to 4 moderators can be entered for each forum. You also may leave any forum without a Moderator.
Moderators are allowed to close, delete, edit or move topics in their own forum. They may also start an ‘Update Threads’ cycle for their own forum and re-index the search data files.
A Moderator must be a registered member.
Edit/Prune Messages
This section of the control panel allows the Administrator to remove multiple messages by date or by username. The Administrator may also edit the subject name or topic content of any post, or delete the topic altogether.
The following options may be used:
Prune By Date
Use this option to remove topics older than a specified
date. Select the forum you want to prune and let the UBB.classic list the
topics it can delete. Scan the list for any topics you wish to keep and uncheck
the box beside the name. UBB.classic will delete all selected items.
Prune By User
You can delete all posts by a user with this option. UBB.classic will
display a list of matches for your search. Leave selected all those you
wish to delete.
Edit/Delete a Message
UBB.classic can retrieve any messages for editing of the title or
message contents. However it is usually more convenient to edit or delete messages
from the topic page itself. Look for the administrative options links at the
bottom of the page.
Announcements
This section of the control panel allows an Administrator or Moderator to create or edit announcements. Moderators may only create and edit announcements in their own forums.
Both HTML and UBB codes are permitted in an announcement.
Create a New Announcement
Enter a title and announcement content. Use the drop down menu to
select the forum or forums in which you want the announcement to
appear. You can select several forums at once by holding the shift key down as
you click on forum names.
Select a starting and closing date carefully. The announcement will appear on the start date selected and be deleted automatically after the end date.
Editing an Announcement
UBB.classic will display all existing Announcements when you use this
option. Select the announcement you want edit. Enter any changes to the content
or dates and save the new announcement.
Miscellaneous and/or Debugging
This section of the control panel allows the Administrator to clean up leftover HTML files or rebuild the main Members list.
Use the drop-down menu to select an action.
Cleanup Dead HTML Files
Use this function to search through the forums for any HTML files without corresponding entries in the forums list. UBB.classic will delete the unneeded files. This is a beneficial utility to run periodically, particularly for very active communities.
Rebuild Member Files
Use this function to recreate the main Members list from the individual members data files. This is particularly useful if you have had a server crash or other corruption of the members list.
Reset Forum Styles
Use this function to reset one or all of your forums to the main style. This can be handy if you need to automatically switch all forums back to one style.
Your UBB [this link opens up your live bulletin board]
Index
This section of the control panel creates a new search index for UBB.classic.
UBB.classic creates a search index automatically with each new topic or reply. But after a major pruning of threads it is wise to re-index the site in order to keep search results accurate.
You must re-index the site if you change the ‘Search Type’ in the General Settings.
Note: UBB.classic indexes only the first 210 characters of each message to speed the process. Words appearing later than this in a message will not appear in a search.
Archives
This section of the control panel administers Archive content. Use this feature to create non-expiring records of important topics. Users cannot reply to archived topics.
The Archives link will open a list of any existing archives and a place to enter a new archive name and description. You can edit or delete Archive names, descriptions or delete an Archive altogether.
In order to add topics to an Archive use the administrative options link at the bottom of any UBB.classic topic page. Click Move/Archive and follow the directions given there.
Mail Users
This section of the control panel allows an Administrator to send a brief email message to allow registered members. Members who have chosen in their profile not to receive mass-mailings will not be included in the process.
The UBB.classic mailing system is not particularly efficient and many servers impose a restriction on how many emails it will allow at once. If you have more than a few hundred users it is better to select the ‘Create Email List Instead:’ option and then use a standalone mass email system. Choose the format required by your email system and let UBB.classic create the file.
Use your FTP software to retrieve the file called emaillist.cgi from your NonCGI directory. Delete this file from your server afterwards.
Digest Center
Your License and Version Updates
This link provides license information.
Quick Start Help
This opens a set of help links.
Visit UBB.classic Support Forums
This takes you to Groupee’s UBB.classic support forums.
|
Appendix A |
Increasing Security in UBB.classic
This Appendix offers some practical advice on increasing the security of your UBB.classic. Some of these instructions apply only to advanced users (where noted).
If you are unsure of how to implement these changes, do not attempt them without expert help. Groupee does not offer customer support for modifications to the standard installation.
Locate the Members' Directory above the Web Root
Wherever possible, locate the members' directory where a browser cannot access it from the Web. For example, it can be located next to rather than inside the www-root directory. However, this solution is not available on all servers. Under no circumstances should this directory be located in a public forum.
Obscure the Name of the Members' Directory
If you must locate the members' directory within the Web directory structure, change the directory name to an obscure one (i.e., a name containing both numbers and letters like "Mem8UyR"). Do not make this change until you have the UBB.classic completely set up and have tested all functions using the regular members' directory name. When you have your UBB.classic working properly, change the name of the members' directory. Then open the control panel general settings and click 'First Time Install'. Edit in the new path to your members' directory exactly and submit the changes.
Make Sure UltBB.setup is Executable
You can prevent people looking at the UltBB.setup configuration file by confirming that it is set to execute as required in the installation instructions.
Lock Your Paths
Create an empty file, naming it "ubbpathlock.cgi", then upload it to your non-cgi/BanLists directory. This will prevent accidental changing of your paths via the control panel, which could break your board.
Create a Dedicated Admin User
It is unwise to leave the Admin5 user on your system. Delete it as soon as you have set yourself up with administrative rights. You may wish to create an administrative account that you use only for the UBB.classic Control Panel.
You should also update your own admin account. Change passwords regularly. From time to time create a new temporary administrator and use that account to delete yourself from the system. Then re-register your name and use the temporary admin login to make yourself an administrator again. This will make it much harder for someone to guess your member file number.
Use Common Sense
Do not post highly sensitive personal or financial information. Never use the same login information for UBB.classic as you do for FTP access to your site. If you are sharing server space, realize that it is not very hard for someone to guess your directories and browse files.
Speak with your server administrator about other ways to secure your directories while maintaining read, write, and delete access for the UBB.classic Perl scripts.
Apply .cgi Mapping to the UBB Directory
The mapping for .cgi may already be added to the entire Web site. If it is not, apply it to your UBB.classic directories and all subdirectories. This will prevent people from browsing the data files.
Map .setup to Prevent Browsing of your Configuration (NT Servers Only)
You can prevent people looking at the UltBB.setup configuration file by using the Internet Service Manager to add a mapping for the .setup extension in the same way it was added for .cgi and .pl. But be sure to map it to something nonsensical like notepad.exe or simply omit the %s %s from the end of perl.exe.
Use an SUID or CGIWrap program (Advanced UNIX Users Only)
The default UBB.classic has wide-open permissions to accommodate the widest range of servers. You may set the scripts to run under your own name with an SUID or CGIWrap program. Then permissions for data files need only be 700 and others will not be able to read files. You can also change the basic umask settings for the account in order to block the chmod command. You may need to use root access to chown -R or chmod -R existing files. Be sure to test your UBB.classic after each change to confirm functionality. Don't forget to give your Web server UID appropriate read access to the .html files.
|
Appendix B |
What to do if Your CGI Directory Does not Accept Writeable Files
UNIX Server Instructions
If you are installing on a UNIX-compatible server, your server may be configured so that it does not allow the CGI directory to contain world-writeable files. If so, you need to make a couple of changes in order to make the UBB.classic run properly.
First, you should move all of the Variable files (mods.file, Styles.file, UltBB.setup, and forums.cgi) from your UBB.classic CGI directory to your UBB.classic NON CGI directory. This NON CGI directory must be set to mode 777.
Next, you must adjust the remaining files in your UBB.classic CGI directory that end in ".cgi". Near the top of each of the following files you will see several "require" statements, such as require "UltBB.setup";. For each script listed below, change the require statements listed to reflect the absolute path location of the file. For example, require "UltBB.setup" might become require "/home/www/UBBNONCGI/UltBB.setup".
§ announce.cgi: change require statements for UltBB.setup, Styles.file, and mods.file to reflect the absolute path. Note: Freeware users do not have this file.
§ cpanel.cgi: change require statements for UltBB.setup, Styles.file, and mods.file to reflect the absolute path.
§ cpanel2.cgi: change require statements for UltBB.setup, Styles.file, and mods.file to reflect the absolute path.
§ cpanel3.cgi: change require statements for UltBB.setup, Styles.file, and mods.file to reflect the absolute path. Note: Freeware users do not have this file.
§ edit.cgi: change require statements for UltBB.setup, Styles.file, and mods.file to reflect the absolute path. Note: Freeware users do not have this file.
§ forumdisplay.cgi: change require statements for UltBB.setup, Styles.file, and mods.file to reflect the absolute path. Note: Freeware users do not have this file.
§ postings.cgi: change require statements for UltBB.setup, Styles.file, and mods.file to reflect the absolute path. Note: Freeware users do not have this file.
§ search.cgi: change require statements for UltBB.setup, and Styles.file to reflect the absolute path. Note: Freeware users do not have this file.
§ Ultimate.cgi: change require statements for UltBB.setup, Styles.file, and mods.file to reflect the absolute path.
§ ubbmisc.cgi: change require statements for UltBB.setup, Styles.file, and mods.file to reflect the absolute path. Note: Freeware users do not have this file.
§ ubbmail.cgi: change require statements for UltBB.setup, mods.file, and Styles.file to reflect the absolute path. Note: Freeware users do not have this file.
Finally, make sure you set the "Absolute Path to Directory Where Your Custom Variable Files Reside" variable in Control Panel (General Variables) to reflect the absolute path to your NON CGI directory.
Win32/NT Server Instructions
If you are installing on a Win32/NT server, your server may be configured so that it does not allow the CGI directory to be set at Read, Write, and Execute. If so, you need to make a couple of changes in order to make the UBB.classic run properly.
First, you should move all of the Variable files (mods.file, Styles.file, UltBB.setup, and forums.cgi) from your UBB.classic CGI directory to your UBB.classic NON CGI directory. This NON CGI directory must be set to Read, Write, and Execute.
Next, you must adjust the remaining files in your UBB.classic CGI directory that end in ".cgi". Near the top of each of these files, you will see a group of lines such as:
Near the top of each of the following scripts you will see several "require" statements, such as require "UltBB.setup";. For each script listed below, change the require statements listed to reflect the absolute path location of the file. For example, require "UltBB.setup" might become require “D:/home/www/UBBNONCGI/UltBB.setup".
§ announce.cgi: change require statements for UltBB.setup, Styles.file, and mods.file to reflect the absolute path. Note: Freeware users don’t have this file.
§ cpanel.cgi: change require statements for UltBB.setup, Styles.file, and mods.file to reflect the absolute path.
§ cpanel2.cgi: change require statements for UltBB.setup, Styles.file, and mods.file to reflect the absolute path.
§ cpanel3.cgi: change require statements for UltBB.setup, Styles.file, and mods.file to reflect the absolute path. Note: Freeware users don’t have this file.
§ edit.cgi: change require statements for UltBB.setup, Styles.file, and mods.file to reflect the absolute path. Note: Freeware users do not have this file.
§ forumdisplay.cgi: change require statements for UltBB.setup, Styles.file, and mods.file to reflect the absolute path. Note: Freeware users don’t have this file.
§ postings.cgi: change require statements for UltBB.setup, Styles.file, and mods.file to reflect the absolute path. Note: Freeware users don’t have this file.
§ search.cgi: change require statements for UltBB.setup, and Styles.file to reflect the absolute path. Note: Freeware users do not have this file.
§ Ultimate.cgi: change require statements for UltBB.setup, Styles.file, and mods.file to reflect the absolute path.
§ ubbmisc.cgi: change require statements for UltBB.setup, Styles.file, and mods.file to reflect the absolute path. Note: Freeware users do not have this file.
§ ubbmail.cgi: change require statements for UltBB.setup, and Styles.file to reflect the absolute path. Note: Freeware users do not have this file.
Finally, make sure you set the "Absolute Path to Directory Where Your Custom Variable Files Reside" variable in Control Panel (General Variables) to reflect the absolute path to your NON CGI directory.
|
Appendix C |
Using an SMTP Server for UBB.classic
If you choose the SMTP email option your must ensure that you have a valid SMTP server and that it will allow relay from your website. The SMTP option is required for Windows NT Server installations and is an option for Unix/Linux Users.
Confirm that Socket.pm is installed
Open your control panel 'General Settings' and perform the 'Socket test' in the second paragraph. If it fails you must install socket.pm before the SMTP option will work.
Enter a valid SMTP Server Name
In the 'Email Options' section of General Settings enter the name of your SMTP server. It will often be something like smtp.yourdomain.com or mail.yourdomain.com. It may also be something your ISP assigns to you, an IP address or even yourdomain.com by itself.
Don't forget to turn 'Email On/Off'' to 'On'. Be sure to enter the name in the correct text box and choose the SMTP option below rather than sendmail. Submit your 'General Settings'.
Test the SMTP Email Function
The easiest way to test is to post a new topic and then use the 'UBBFriend' feature at the top right corner. Send an email to yourself.
If you do not receive any error, it is likely the SMTP server is correctly set up for UBB. Wait a few minutes and check your own email. If you receive the message, all the other UBB.classic email functions will work as well.
Deal With Any Errors
There are two kinds of SMTP errors UBB.classic will report to you.
"The server does not respond appropriately.. it may not be an SMTP server." This error means that your SMTP server name is not an SMTP server at all, or is seriously misconfigured. Try another SMTP name or contact your ISP.
"Cannot relay for .." or "User xxx@yyy requires authentication" or "200 .." These errors all mean that the SMTP server is blocking relay to prevent spam. You will need to enter an exception for your domain, IP address or machine name in the SMTP server security configuration.
Both Microsoft SMTP Server and Ipswitch IMail have this option available.
Check as well that the contact email in the 'General Settings' is a real email address in your Domain. Some SMTP servers will authenticate based on this address alone.
If SMTP is Unavailable
If SMTP is not available you must turn 'off' all the email options in the control panel 'General Settings'. You will not be able to use email verification of new members, the lost password, feature, digests, UBBFriend or moderator notification, among others. Needless to say, every effort should be given to obtaining a working SMTP.
|
Appendix D |
Here are the solutions to some common problems you may encounter when installing the UBB.classic (these apply to most web servers---see additional tips specific to NT and UNIX at the end of this Appendix).
Files Don't Unzip into Folders
All popular unzipping programs have a setting to preserve folder or directories. Look in a section called Options for a setting; then unzip the files again. If you have an older unzipping program, you may need to download a newer version. We recommend WinZip, which is available from www.tucows.com.
Cannot Log onto Web Server
Check your hostname, login name and password carefully. If you cannot access your web site, contact your ISP.
How Do I Upload Files in ASCII Mode?
Each FTP system will have an option to choose 'ASCII' instead of Binary transfer. In Macs this is called 'text' mode. All files that end with .html, .cgi, .pl, .file or .setup must upload in ASCII. Your images [.gif and .jpg] can upload in binary or in the 'automatic' setting.
I can't find my Control Panel - error 'Not Found'
Check carefully that your web address has the directory on the end of the URL. The file name extension is cp.html, not cp.htm. Spelling and case must be exact.
When I click on 'General Settings' it says 'File not Found'
This means that the cplinks.html file is not edited correctly. Check again that the URL in each link points to your CGI directory.
The specified CGI application misbehaved ..
Check first to ensure that your cplinks.html file has been edited to point to the cgi directory. Test by entering a full path manually---e.g., http://mydomain/mycgidir/cpanel.cgi?action=env .
Error including required files: etc ...
This usually means you uploaded one or more of UltBB.setup, Styles.file, mods.file or forums.cgi in binary instead of the required ASCII mode. It can mean you have forgotten one of these files or that your FTP client has made the file names lower case. It must be UltBB.setup not ultbb.setup.
I can't figure out my Absolute paths
Use the paths suggested by the UBB Environmental Variables link if there are any. You can also consult your ISP to be sure.
Sorry, but we couldn't find a record for the UserName you entered
This almost always means that the path to your Members directory is not correct. Very rarely it can mean that you have not made a Members directory and uploaded the Admin5.cgi file to it.
My UBB.classic does not Open from the Control Panel
It is likely that you have not edited the cplinks.html so that the link to Ultimate.cgi includes the correct location for your CGI directory.
I Cannot Register
This means you do not have correct permissions set for your Members directory. If you have chosen to have 'email verification' and do not receive your password, this means you have not set your SMTP server name correctly or your ISP does not allow relay from your domain.
NT-Specific Troubleshooting
When I click on 'General Settings' there is only Text
This means that your CGIdirectory is not set to execute scripts. You can add this through FrontPage, the Internet Service Manager or the Personal Web Server Manager
When I click on 'General Settings' - nothing happens
This means that .cgi and .pl are not mapped correctly to Perl in the Internet Service Manager. A frequent omission is the %s %s on the end of perl.exe. See Appendix E - Mapping .cgi and .pl in the Microsoft IIS4 Web Server
%1 is not a valid NT Application
This means that .cgi and .pl are not mapped correctly to Perl in the Internet Service Manager. See Mapping .cgi and .pl in the Microsoft IIS4 Web Server
Blank Screen with no Message or 'Document Contains No Data'
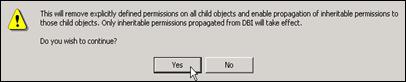
This means that UBB.classic cannot write new files and is a very common problem. It means that NT permissions have not been set correctly for one or more of your CGI, /Members or /ubb directory. Use the ubb_test.cgi in the “nt_tools.zip” to test each path manually. See Appendix F - Setting NT Permissions.
'Can't Find Username' when I set Styles, Forums or Moderators
This will mean that your Members directory does not have permissions set properly. See the solution directly above. Correct the permissions and resubmit your general settings before you attempt to set the Styles, Forums or Moderators Options.
UNIX-Specific Troubleshooting
When I click on 'General Settings' there is only Text
This means that you have not set the 755 permissions on each script. It may also mean your ISP does not support cgi scripts at all.
When I click on 'General Settings' there is a 500 Server Error
This could mean the script was not uploaded in ASCII properly. Upload it again. It may mean the top line of the script does not point to Perl. The most common paths are #!/usr/bin/perl and #!/usr/local/bin/perl You can edit in these changes with your Notepad text editor.
Blank Screen with no Message or 'Document Contains No Data'
This means that UBB.classic cannot write new files. Check that the 4 variables files [UltBB.setup, Styles.file, forums.cgi, mods.file] have 777 permissions. Check that the ubb directory that you created exists and has 777 permissions.
'Can't Find Username' when I set Styles, Forums or Moderators
This will mean that your Members directory has not been set to 777 permissions or the file Admin5.cgi does not have 777 permissions. Correct this and resubmit the General Settings before you try submitting Styles, Forums or Moderator Options.
|
Appendix E |
Mapping .cgi and .pl in the Microsoft IIS4 Web Server
The IIS4 Server is not set up by default to run Perl. Therefore the NT Admin must make two simple changes: Mapping .cgi and .pl to Perl and Adding new NTFS permissions for the IUSR_ Internet Guest Account. Changes take only minutes.
1. Open your 'Internet Service Manager'
The ISM is usually found in the Start Menu as part of 'Windows NT 4.0 Option Pack' ->Web Server ->
Select and Open your Web Site.
Select the Virtual Web Site (for example...Default Web Site, or whatever.com). If you want to change information for a specific directory, expand the website and select that directory. If you want the changes to apply to that entire virtual web site, just leave the entire site selected instead of an individual directory.
Right click on the folder for 'Properties'.
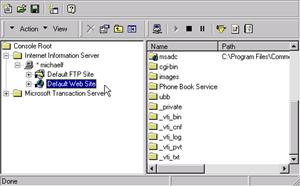
2. Open the Web Site Properties
Click the tab called 'Directory' or 'Home Directory'.
Check the option 'Execute (including script)' on in the bottom left corner.
Look for 'Application Settings' and click the button for 'Configuration'. This button may also be labeled 'Create'. This click will open a list of available 'Applications Mappings' in your web site.
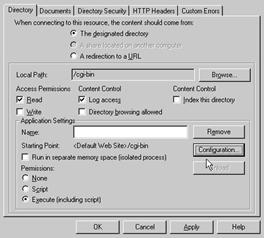
3. Add or Edit a Mapping to Perl
Look in the 'Applications Configuration' list for .cgi and .pl. There may already be one for .pl if you made a default installation of ActiveState Perl. If so, click edit and simply copy the information from this setting to use in the next step.
Click 'Add' to make a new mapping for .cgi
Uncheck the 'Script Engine' and 'Check that file exists' boxes in the left corner.
In the top of the 'Add/Edit Application Extension' window there is a value called 'Executable' Use the browse button to find perl.exe or perlis.dll on your computer. It will be something like C:\Perl\bin\perl.exe or C:\Perl\bin\perlis.dll
If you are using C:\Perl\bin\perl.exe you must add [space]%s[space]%s after the path. See the image below for an exact example.
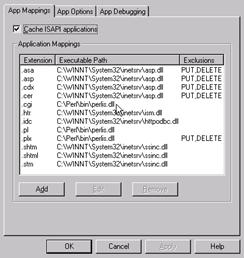
In the 'Extension:' box type in .cgi [or .pl if you are mapping .pl]. There is a dot in front of cgi and pl
Leave the box called 'Method Exclusions:' blank.
Repeat these steps for the .pl extension if necessary. UBB.classic requires that both .cgi and .pl extensions be mapped correctly. Click OK -> OK -> to close down the windows and click 'Yes' to the 'Save console settings to iis?' if asked.

4. Test the New Mappings
Install the hello.cgi and hello.pl scripts found in “ubb_nt_tools.zip” and call each one from your web browser i.e. http://mydomain/mycgidir/hello.cgi. If you are testing on a local computer you may also use localhost/mycgidir/hello.cgi. Unless you see a short message from Perl, check each of the steps above one more time.
5. Set NT File Permissions
See Appendix F – Setting NT File Permissions to complete this separate step.
|
Appendix F |
UBB.classic requires minor changes to allow Perl to read, write, execute and delete files in the directories used by the scripts. All changes can be made using NT Explorer by an authorized administrator. If you are using space on an ISP, please contact your NT support for these changes.
Open your NT Explorer
Use the 'Start Menu' -> 'Programs' -> 'Windows NT Explorer' and find the directories in which you have installed your UBB.classic files.
Right click on one of the UBB.classic Directories
Select 'Properties' from the options menu. Please
make sure the directory is part of your web site.
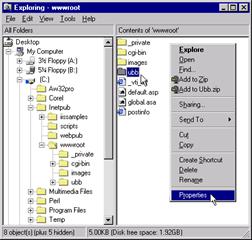
Find the List of Existing Permissions
Within the directory Properties click the 'Security' Tab on the top right and then click the 'Permissions' button. You will see a list of users with permissions in this directory.
Click 'Add' to give a new user permissions in this directory. Next Click 'Show Users' to list all available users on your system. This may be a long list. Wait until it loads
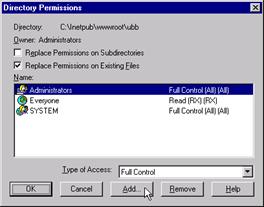
Add 'Change' Permissions for IUSR_[your computer name]
Find the user called IUSR_[your computer name] (Internet Guest Internet server Anonymous Access) and select this name by clicking on it.
At the bottom of the window is a selection box called 'Type of Access'. Use it to select the option called 'Change'.
Next, click the 'Add' button and this new user will appear in the 'Add Names:' box.

Apply the New Permissions to Files and Subdirectories
Click 'OK' after you confirm the IUSR_[your computer name] is listed there with 'Change (RWXD)(RWXD)' beside it.
Check that both the 'Replace Permissions on Subdirectories' and 'Replace Permissions on Existing Files' are checked 'on'
Click 'OK' to apply the permissions and ‘OK’ to close out the window.
Repeat these steps for the CGI and Members Directories
These new Permissions must be applied to the CGI directory, the NonCGI directory, and the Members directory. Repeat the above steps for each of the directories.
|
Appendix G |
Installing UBB.classic on Win98/Personal Web Server 4
Set Up Perl on Microsoft Windows 95/98 PCs w/ Personal Web Server 4
To use UBB.classic on a Windows 95/98 PC, you need to install Microsoft Personal Web Server 4.0 and Perl 5 on the computer and then set up PWS to recognize Perl and CGI scripts and execute them using perl.exe.
Microsoft has several versions of PWS available; version 4 is the latest that works with Windows 95/98 (and with Windows NT Workstation 4.0). PWS 4.0 is included on the Windows 98 disk at the following location Z:\add-ons\pws\setup.exe (substitute your CD-ROM drive letter for Z to install PWS). If you need PWS 4.0 to use with Windows 95 or WinNT Workstation 4.0, you can download it from the Microsoft PWS site.
Download and Install Perl
First, you need to have ActiveState Perl installed on your system. If you do not have ActiveState Perl installed, you can download ActiveState Perl from the Active State Website. (It's free!)
1. Configure PWS 4.0 to run CGI scripts with Perl
After installing Perl, Microsoft Personal Web Server on Windows 95/98 can be configured by adding two values to the registry. You can do this manually using the following steps:
A. From the Start menu, click Run, type regedit, and click OK. The registry editor will open.
B. Navigate to HKEY_LOCAL_MACHINE\System\CurrentControlSet\ Services\W3Svc\Parameters\Script Map using the explorer-like interface on the left side of the screen. Click the folder icon next to Script Map.
C. In the right frame, click the right mouse button, and choose "New >" and then "String Value" from the popup menu. Type .cgi (yes, there is a dot in there) for the name of the key, and press ENTER. Now double-click the .cgi you just created to open a dialog box. For Value data, type c:\perl\bin\perl.exe %s %s, and press ENTER.
D. Repeat the above step using .pl instead of .cgi.
E. Close the registry editor by selecting Registry | Exit.
F. Restart your web server by rebooting your Computer.
2. Set up the UBB Directory
A. The easiest setup is to create a directory called ubb somewhere on your server (whatever drive and path you like...we will make it a virtual directory later on the web server).
B. Copy all the individual files from the CGI, NONCGI, and variable_files folders (not the folders...just the files) into the ubb directory.
C. Copy the entire Members folder into the ubb directory.
D. Make
9 Folders inside the ubb directory, named Forum1
through Forum9. Your ubb
directory should look similar to this:
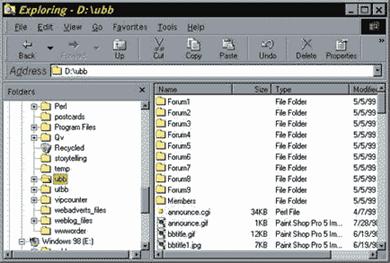
3. Set the Server permissions
A. Launch the Personal Web Manager and select the Advanced tab (lower left).
B. From the Home Directory, click the Add button, browse to the ubb directory and type ubb in the Alias block. Ensure the read, execute and scripts blocks are checked. Press OK to add the new directory. (see the picture below).
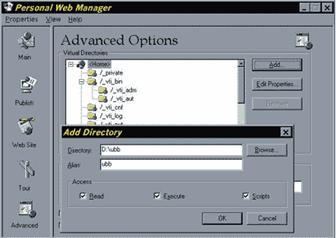
4. Set the UBB variables using the Control Panel
A. Point your browser to your cp.html page (in the above example it is at http://your.server.com/ubb/cp.html)
B. The Absolute paths in the above example for CGI, Non-CGI and Variable directories is d:/ubb and the Members directory is d:/ubb/Members (notice the direction of the slash.)
Continue with normal instructions…
Follow the rest of the normal installation instructions (Chapter 2, starting with section 4...you will probably not need to edit the links, since the cgi files and cplinks.html file are in the same directory).
|
Appendix H |
Setting Win2K/IIS5 Permissions
Below are step-by-step instructions for setting permissions on Win2K/IIS5 Servers.
1. Right click on your ubb directory and choose properties. Click the security tab.
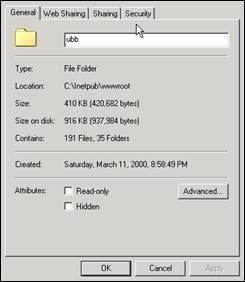
2. Select the Internet Guest Account, checkmark the “allow inheritable” box on the bottom left, select all except Full Control in the Allow column, and click the Advanced button.
Your screen should look like this:
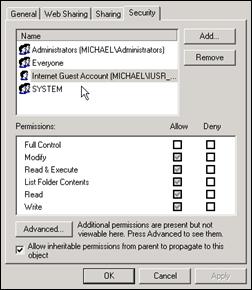
Once your screen matches these settings, click “OK”. This will bring up message below. Click OK. Repeat the procedure above for your UBB.classic CGI directory.