|
Ultimate 1MB expansion for Atari XL/XE For Sale
|
 When you click on links to various merchants on this site and make a purchase, this can result in this site earning a commission. Affiliate programs and affiliations include, but are not limited to, the eBay Partner Network. When you click on links to various merchants on this site and make a purchase, this can result in this site earning a commission. Affiliate programs and affiliations include, but are not limited to, the eBay Partner Network.
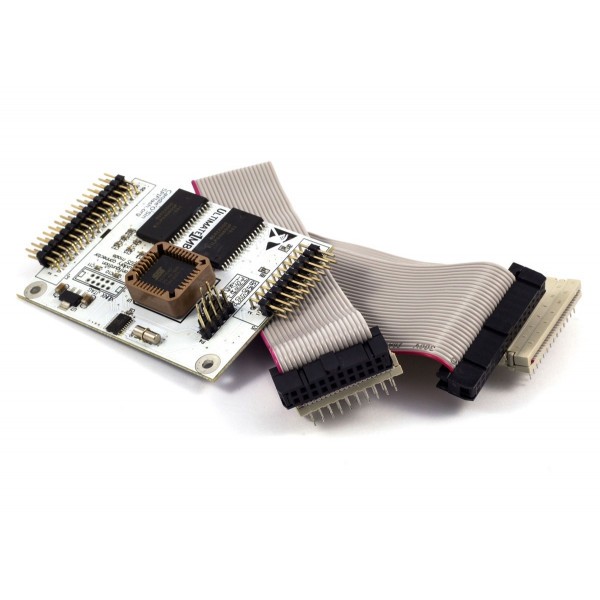
Ultimate 1MB is one of the best ATARI 8bit internal upgrades ever, invented by Sebastian Bartkowicz aka Candle\'o\'Sin. Installation of this upgrade is really straightforward. It\'s easy, it\'s simple, it\'s FUN! Also, in the present version some fixes were applied in comparison to the initial release. Now it\'s 100% "safe and solderless as possible (only RW, PHI2, HALT and RESET lines need soldering when chips are socketed, completely solderless with U1MB Sally adapter, available in our other items) fully flashable SpartaDOS-X with up to 320 kilobytes of space for its purposesReal Time Clock module for SDX with battery backup and NVRAMfully flashable 4 OS ROM slotshardware write protect for the whole flash arrayconfigurable memory expansion with 4 modes of operation (disabled, 320k Rambo, 576k Compy Shop, 1088k Rambo)customisable BASIC and MISSILE COMMAND slots (also flashable)compatible with all XL/XE machines (600XL needs to be expanded to 64kB of Ultimates are sold with straight headers: IN THE BOX - high quality Ultimate 1MB board
- Harting MMU adapter -> 20 IDC Female cable
- Harting OS ROM adapter -> 28 IDC FEMALE ADAPTER
- 4pin connection cable
- fitting you are not familiar with soldering or you do not have proper tools, we can install the expansion for you. Please contact us to arrange installation.
If you are installing the device yourself, we will not take any responsibility for any damage to your hardware and the device will NOT be subject of any kind of warranty. INSTALLATION STEP BY STEP: Locate MMU (20 pins) and OS ROM (28 pins) and their pin #1 General rule of pin identification - If Your chips are in sockets:
- Remove MMU (20 pins) and OS ROM (28 pins) chips from their sockets
- Insert flat cable with "chip-adapter" side into MMU and OS ROM sockets (red wire indicates pin 1 of removed chip)
- Make proper 4 wire connection of Ultimate 1MB PCB with CPU
You might also consider using U1MB Sally adapter (available in our other items) for solderless installation. - Connect flat cables with "IDC-side" to Ultimate board (red wire cable indicates pin 1 of the connector)
- Fit Ultimate 1MB PCB inside Atari case
- If your chips are not in sockets:
- Desolder MMU (20 pins) and OS ROM (28 pins) from the motherboard
- Solder sockets into the places of removed chips (sockets are not supplied)
- Insert flat cable with "chip-adapter" side into MMU and OS ROM sockets (red wire indicates pin 1 of removed chip)
- Make a proper connection with supplied 4 wire cable between Ultimate 1MB PCB and CPU
You might also consider using U1MB Sally adapter (available in our other items). This would require desoldering the CPU as well. - Connect flat cables with "IDC-side" to Ultimate board (red wire indicates pin 1 of the connector)
- Fit Ultimate 1MB PCB inside Atari You can power on Atari, enter setup (HELP + RESET) and adjust all you want!

|
|
|
|